PowerFactory to pandapower
Export of PowerFactory networks to Pandapower can be done in two ways: using a GUI User defined tool in PowerFactory or using a python function in “Engine mode”. It is more convenient to use the exporter with a User defined tool if the user exports a small amount of networks from PowerFactory. Using the converter in “Engine mode” is beneficial when there is a number of networks that are to be converted in bulk. The documentation describes how to use the exporter as a function in “Engine mode” and, alternatively, how to configure and use the User defined tool.
Supported components:
ElmTerm (Buses)
ElmLne (Lines)
ElmLnesec (Line Section)
ElmTr2 (2-Winding Transformers)
ElmTr3 (3-Winding Transformers)
ElmLod (Loads)
ElmLodmv (Medium Voltage Loads)
ElmXnet (External Grids)
ElmGenstat (Static Generators)
ElmPvsys (PV System)
ElmSym (Synchronous Generators)
ElmAsm (Asynchronous Machines)
ElmStactrl (Station Controller)
ElmShnt (Shunts)
ElmVac (AC Voltage Source)
ElmCoup (Bus-Bus switches)
RelFuse (Fuses)
ElmZpu (pu Impedance)
ElmSind (Series Reactor)
Elmscap (Series Capacitor)
ElmSvs (Static Var Compensator with Voltage Control)
Note
Not all possible settings from PowerFactory can be imported to pandapower, as either pandapower does not support the same range of functionality or the import is not yet possible.
Setup PowerFactory and Python
In order to use Python in combination with PowerFactory, do the following configurations. Make sure that the system python path (environment variable PYTHONPATH) contains the directory to ‘powerfactory.pyd’ file in the PowerFactory installation folder. This should be e.g.
C:\\Program Files\\DIgSILENT\\PowerFactory 2022 SP1\\Python\\3.10
After setting PYTHONPATH, one should restart the computer. You can also use the following python commands (but it is better to set up PYTHONPATH instead)
import sys
sys.path.append("C:\\Program Files\\DIgSILENT\\PowerFactory 2022 SP1\\Python\\3.10")
If an error message “DLL load failed: the specified module could not be found” appears, make sure you have Microsoft Visual C++ Redistributable for Visual Studio 2013 (or later) installed on your computer. At the moment (PowerFactory 2022 SP 1), the latest supported VisualStudio version is 2019 (version 16.x).
If an ImportError occurs in relation to numpy, uninstall numpy and install it again, for example with:
pip install numpy -U
In the PowerFactory configuration menu (Tools/Configuration), set up the path to the Python executable from the used environment or select Python by version.
For more details on how to use Python with PowerFactory, refer to PowerFactory User Manual, Chapter 21.2.4.
Try to do:
import powerfactory
in Python. If this imports without a problem, you are ready to start exporting from PowerFactory to pandapower with a User Defined Tool or importing networks to the pandapower format from python. Please note that Load Flow calculation must be possible in PowerFactory to be able to export grids to pandapower.
Import from Python
Before using the PowerFactory engine mode, import powerfactory module and initialize the PowerFactory Application object, which starts the instance of PowerFactory
import powerfactory as pf
app = pf.GetApplication()
In order to start converter in engine mode, use the function “from_pfd”:
from_pfd(app, prj_name: str, path_dst=None, pv_as_slack=False, pv_as_slack=False, pf_variable_p_loads='plini',
                            pf_variable_p_gen='pgini', flag_graphics='GPS', tap_opt='nntap',
                            export_controller=True)

Inputs:
 * app: PowerFactory Application object
 * prj_name: Name (”Project”), full qualified name (”Project.IntPrj”) or full qualified path (”nUsernProject.IntPrj”) of a project.
 * path_dst: Destination for the export of .json file (full file path)
 * pv_as_slack: whether "PV" nodes are imported as "Slack" nodes
 * pf_variable_p_loads: variable to use as input for p_kw, can be 'plini', 'plini_a' or 'm:P:bus1'
 * pf_variable_p_gen: variable to use as input for p_kw, can be 'pgini', 'pgini_a' or 'm:P:bus1'
 * flag_graphics: set up the source for graphical information, either 'GPS' or name of the network diagram in PowerFactory
 * tap_opt: variable for tap position of transformers, can be 'nntap' or 'c:nntap'
 * export_controller: whether controller should be exported

Output:
 * net: pandapower net
 * controller: pandapower controller objects
 * Saves pandapower network as .json file at path_dst
The function can be used as following:
from pandapower.converter.powerfactory import from_pfd
net = from_pfd(app, prj_name="Your Project Name", path_dst="Save Path")
Note
PowerFactory has to be closed to start the conversion
It is recommended to set “use_nominal_power” to False because then the values of scaling factors and characteristics will be considered at export.
Note
When using the converter, a Power Factory Application object is initialized, meaning that Power Factory is started in the background. There is no way to terminate the application once it has been started from Python other than by terminating the Python thread it was started from. Therefore, execute the converter in a separate thread that can be terminated after the converter has been executed.
User Defined Tool
Networks can be exported to pandapower from within PowerFactory by defining it as a PowerFactory User-defined Tool.
Note
In case you are using the Anaconda distribution, you might encounter ImportErrors with numpy’s MKL-libraries (or other binaries). Try adding \path\to\Anaconda3\Library\bin to the path under Tools > Configuration > Advanced.
The script files can be found in the pandapower\converter directory:
Note
Directory: ~\pandapower\pandapower\converter\powerfactory
The user defined tool is implemented with the library tkinter, which is included in the standard Python installation. In order to setup the tool in PowerFactory, execute the following steps.
Setup User Defined Tool
Import the script icon
The icon is contained in the file ‘icon.pfd’ in the directory power_factory_files. The file should be inported to PowerFactory as a .pfd import. A folder ‘icon’ will appear in PowerFactory, and the element from this folder should be copied to the database folder ~\Configuration \Icons.
Note
The files should be imported using the Administration mode, otherwise the user has no access to the aforementioned folders. Alternatively, they can be imported into the user folders that can be accessed without the Administrator privileges, it should not impact the functionality of the script.
To use PowerFactory in Administration mode, either start PowerFactory in this mode using the respective shortcut in the Start menu, or navigate to TOOLS \Switch User… and select “Administrator”. The software will require a password, which is by default “Administrator”. After that, the user has access to PowerFactory folders that are usually locked for editing.
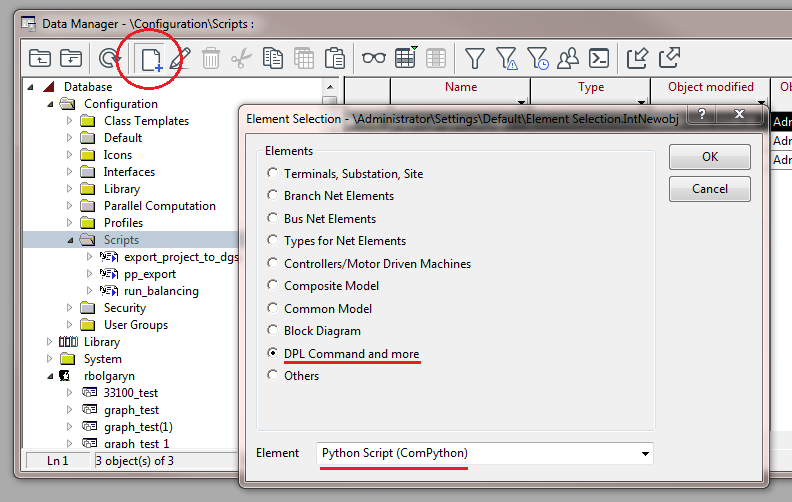
Create ‘ComPython’ object
An object of class ‘ComPython’ (Python script) should be created in ~\Configuration \Scripts, where the path to the Python file ~\export_pf_to_pp \main_pf.py should be provided. The ‘ComPython’ object can be created by selecting the target folder in the Data Manager and clicking the pictogram “New Object” – see illustration below.
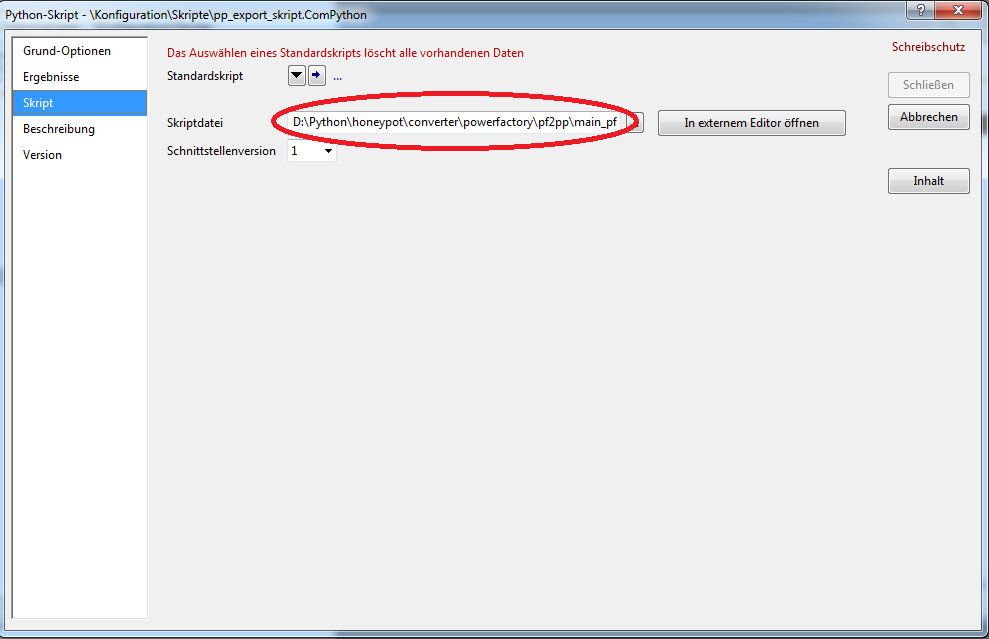
The following image illustrates the path configuration in the ‘ComPython’ object:
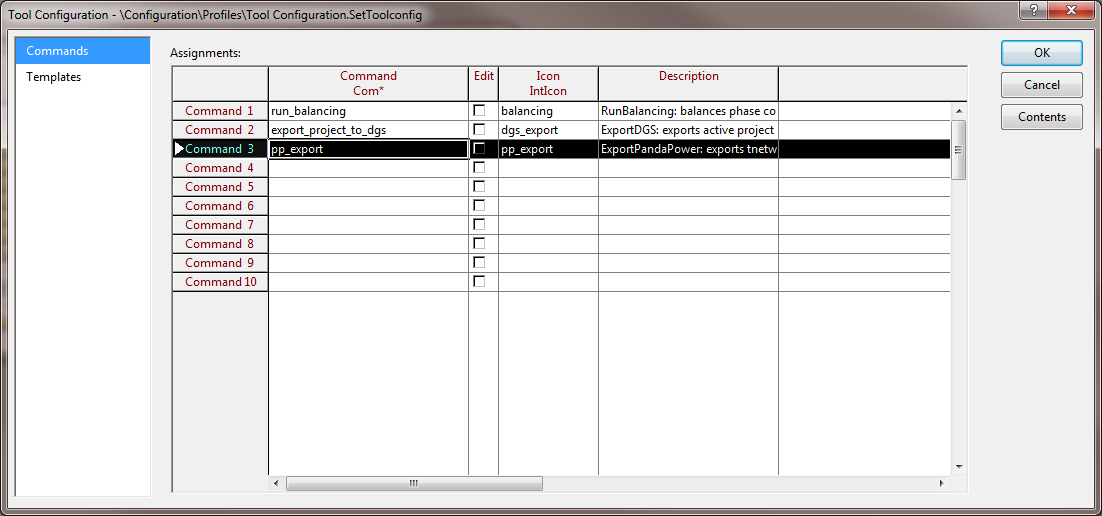
Configure User-Defined Tool
Finally, the tool should be configured to be included in the Toolbox in PowerFactory. For that, navigate to the PowerFactory Menu \TOOLS \Tool Configuration… In newer versions of PowerFactory, the Tool Configuration can be found in the Administration menu. The Tool Configuration window appears, where the icon and the script should be input into a free row. Click on the cells to provide path to the icon and the ‘ComPython’ object. The result is shown in the following figure.
At this moment the Administrator mode is no longer necessary. Switch to the normal user account.
Using the Converter
After configuring the tool, the icon appears in the User-Defined Tools Toolbox. It can be accessed by clicking the symbol that is marked by a red circle in the following figure. The icon of the tool is marked with a blue circle.

When a project is activated, click on the icon. A window will appear, where the user is required to provide the path for saving the .json file. The button ‘Export’ activates the export, and the button ‘Cancel’ terminates it. The interface window is shown below:
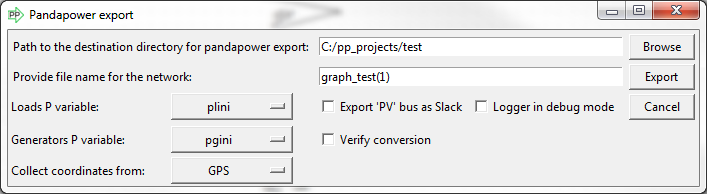
The filename can not contain special characters, such as “/”.
- The User interface has additional options that can be defined using CheckBoxes:
Export ‘PV’ bus as Slack: defines whether ‘PV’ power injections are to be defined as Slack in pandapower
Verify conversion: defines whether the network should be verified after the conversion. If the option is set, the pandapower network will be verified by executing a load flow calculation and comparing the results to values in PowerFactory. This happens after the .json file has been saved to the hard drive.
Logger in debug mode: can be used in case exporter stops at error. In this case more logging messages are shown.
Export Controller: feature is not yet implemented with the user-defined tool
Additional options that are provided by user define what variables in PowerFactory should be used to define power of loads and generators. This selection is done using the drop-down menus “Loads P variable” and “Generators P variable”. The implemented variants are “plini/pgini” (nominal values), “plini_a/pgini_a” (actual values) and “m:P:bus1” (bus results values). The option “Collect coordinates from” defines where the coordinates for buses and lines originate. The choices are “no geodata” (no coordinates will be defined), “GPS” (data from the “description/GPSlat, GPSlon) or the available network diagrams. The data from network diagrams is taken from the graphical objects (“IntGrf”) of buses and lines.
The export can be verified using the function validate.validate_pf_conversion(). The logging of export and verification is printed in the Output window, so that the progress is documented and illustrated to the user. An example of the logging can be as following:
Log output
DIgSI/info - Python Script ‘pp_export’ started
- This pandapower network includes the following parameter tables:
gen (1 elements)
switch (10 elements)
load (3 elements)
bus (13 elements)
trafo (1 elements)
line (13 elements)
bus_geodata (13 elements)
sgen (1 elements)
impedance (1 elements)
line_geodata (13 elements)
- and the following results tables:
res_load (3 elements)
res_gen (1 elements)
res_bus (4 elements)
res_sgen (1 elements)
res_trafo (1 elements)
res_line (13 elements)
DIgSI/info - Python Script ‘pp_export’ successfully executed